Run a simple JavaScript(Node) sample on B&R APC device running B&R Linux
Table of Contents
- Introduction
- Step 1: Configure Azure IoT Hub
- Step 2: Register Device
- Step 3: Build and validate the sample using Node JS client libraries
- Step 4: Troubleshooting
Introduction
About this document
This multi-step process includes:
- Configuring Azure IoT Hub
- Registering your IoT device
- Build and deploy Azure IoT SDK on device
- Packaging and sharing the logs
Prepare
Before executing any of the steps below, read through each process, step by step to ensure end to end understanding. You should have the following items ready before beginning the process:
- Computer with GitHub installed and access to the azure-iot-sdk-node GitHub private repository
- (Optional) SSH client, such as PuTTY, so you can access the command line
- Required hardware to certify
Step 1: Sign Up To Azure IoT Hub
Follow the instructions here on how to sign up to the Azure IoT Hub service.
As part of the sign up process, you will receive the connection string.
-
IoT Hub Connection String: An example of IoT Hub Connection String is as below:
HostName=[YourIoTHubName];CredentialType=SharedAccessSignature;CredentialScope=[ContosoIotHub];SharedAccessKeyName=[YourAccessKeyName];SharedAccessKey=[YourAccessKey]
Step 2: Register Device
In this section, you will register your device using DeviceExplorer. The DeviceExplorer is a Windows application that interfaces with Azure IoT Hub and can perform the following operations:
- Device management
- Create new devices
- List existing devices and expose device properties stored on Device Hub
- Provides ability to update device keys
- Provides ability to delete a device
- Monitoring events from your device.
- Sending messages to your device.
To run DeviceExplorer tool, follow the configuration strings as described in Step1:
- IoT Hub Connection String
Steps:
-
Click here to download and install DeviceExplorer.
-
Add connection information under the Configuration tab and click the Update button.
-
Create and register the device with your IoT Hub using instructions as below.
a. Click the Management tab.
b. Your registered devices will be visible in the list. In case your device is not there in the list, click Refresh button. If this is your first time, then you shouldn’t retrieve anything.
c. Click Create button to create a device ID and key.
d. Once created successfully, device will be listed in DeviceExplorer.
e. Right click the device and from context menu select “Copy connection string for selected device”.
f. Save this information in Notepad. You will need this information in later steps.
Not running Windows on your PC? - Please follow the instructions here to provision your device and get its credentials.
Step 3: Build and validate the sample using Node JS client libraries
This section walks you through building, deploying and validating the IoT Client SDK on your device running a Linux operating system.
3.1 Load the Azure IoT bits and prerequisites on device
-
Open a terminal session on the device.
-
Choose your commands in next steps based on the OS running on your device.
-
Run following command to check if NodeJS is already installed
node --versionIf version is 0.12.x or greater, then skip next step of installing prerequisite packages. Else uninstall it by issuing following command from command line on the device.
Debian or B&R Linux
sudo apt-get remove nodejsAny Other Linux OS
Use equivalent commands on the target OS -
Install the prerequisite packages by issuing the following commands from the command line on the device. Choose your commands based on the OS running on your device.
B&R Linux or Debian or Ubuntu
curl -sL https://deb.nodesource.com/setup_4.x | sudo bash -

sudo apt-get install -y nodejs
Any Other Linux OS
Use equivalent commands on the target OSNote: To test successful installation of Node JS, try to fetch its version information by running following command:
node --version -
Download the SDK to the board by issuing the following command in terminal:
git clone --recursive https://github.com/Azure/azure-iot-sdk-node.git -
Verify that you now have a copy of the source code under the directory ~/azure-iot-sdk-node.
3.2 Build the samples
-
To validate the source code run the following commands on the device.
export IOTHUB_CONNECTION_STRING='<iothub_connection_string>'Replace the
<iothub_connection_string>placeholder with IoTHub Connection String you got in Step 1. -
Install npm package to run sample.
cd ~/azure-iot-sdk-node/device/samplesFor AMQP Protocol:
npm install azure-iot-device-amqpFor HTTP Protocol:
npm install azure-iot-device-httpFor MQTT Protocol:
npm install azure-iot-device-mqttFor Web Sockets with AMQP Protocol:
npm install azure-iot-device-amqpFor Web Sockets with MQTT Protocol:
npm install azure-iot-device-mqtt -
To update sample, run the following command on device.
cd ~/azure-iot-sdk-node/device/samples nano simple_sample_device.js -
This launches a console-based text editor. Scroll down to the protocol information.
-
Find the below code:
var Protocol = require('azure-iot-device-amqp').Amqp;The default protocol used is AMQP. Code for other protocols(HTTP/MQTT) are mentioned just below the above line in the script. Uncomment the line as per the protocol you want to use.
-
Scroll down to the connection information. Find the following place holder for IoT connection string:
var connectionString = "[IoT Device Connection String]"; -
Replace the above placeholder with device connection string. You can get this from DeviceExplorer as explained in Step 2, that you copied into Notepad.
-
Save your changes by pressing Ctrl+O and when nano prompts you to save it as the same file, just press ENTER.
-
Press Ctrl+X to exit nano.
-
Run the following command before leaving the ~/azure-iot-sdk-node/device/samples directory
npm link azure-iot-device
3.3 Run and Validate the Samples
In this section you will run the Azure IoT client SDK samples to validate communication between your device and Azure IoT Hub service. You will send messages to the Azure IoT Hub service and validate that IoT Hub has successfully receive the data. You will also monitor any messages send from the Azure IoT Hub to client.
Note: Take screen shots of all operations, like sample screen shots, performed in below sections. These will be needed in Step 4
3.3.1 Send Device Events to IOT Hub:
-
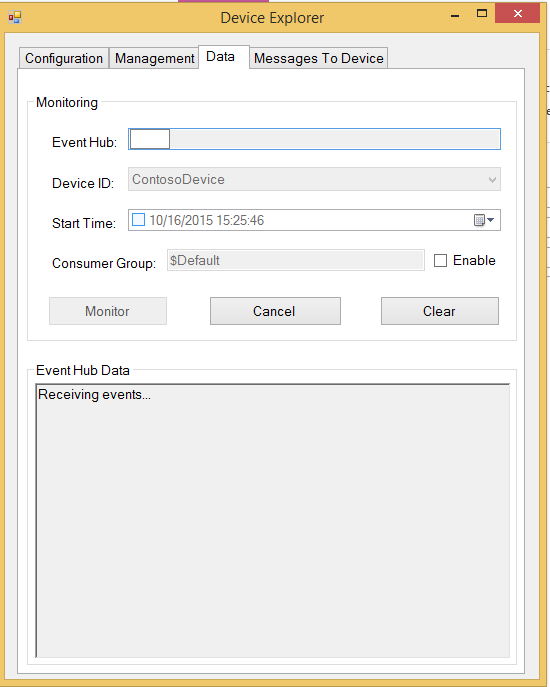
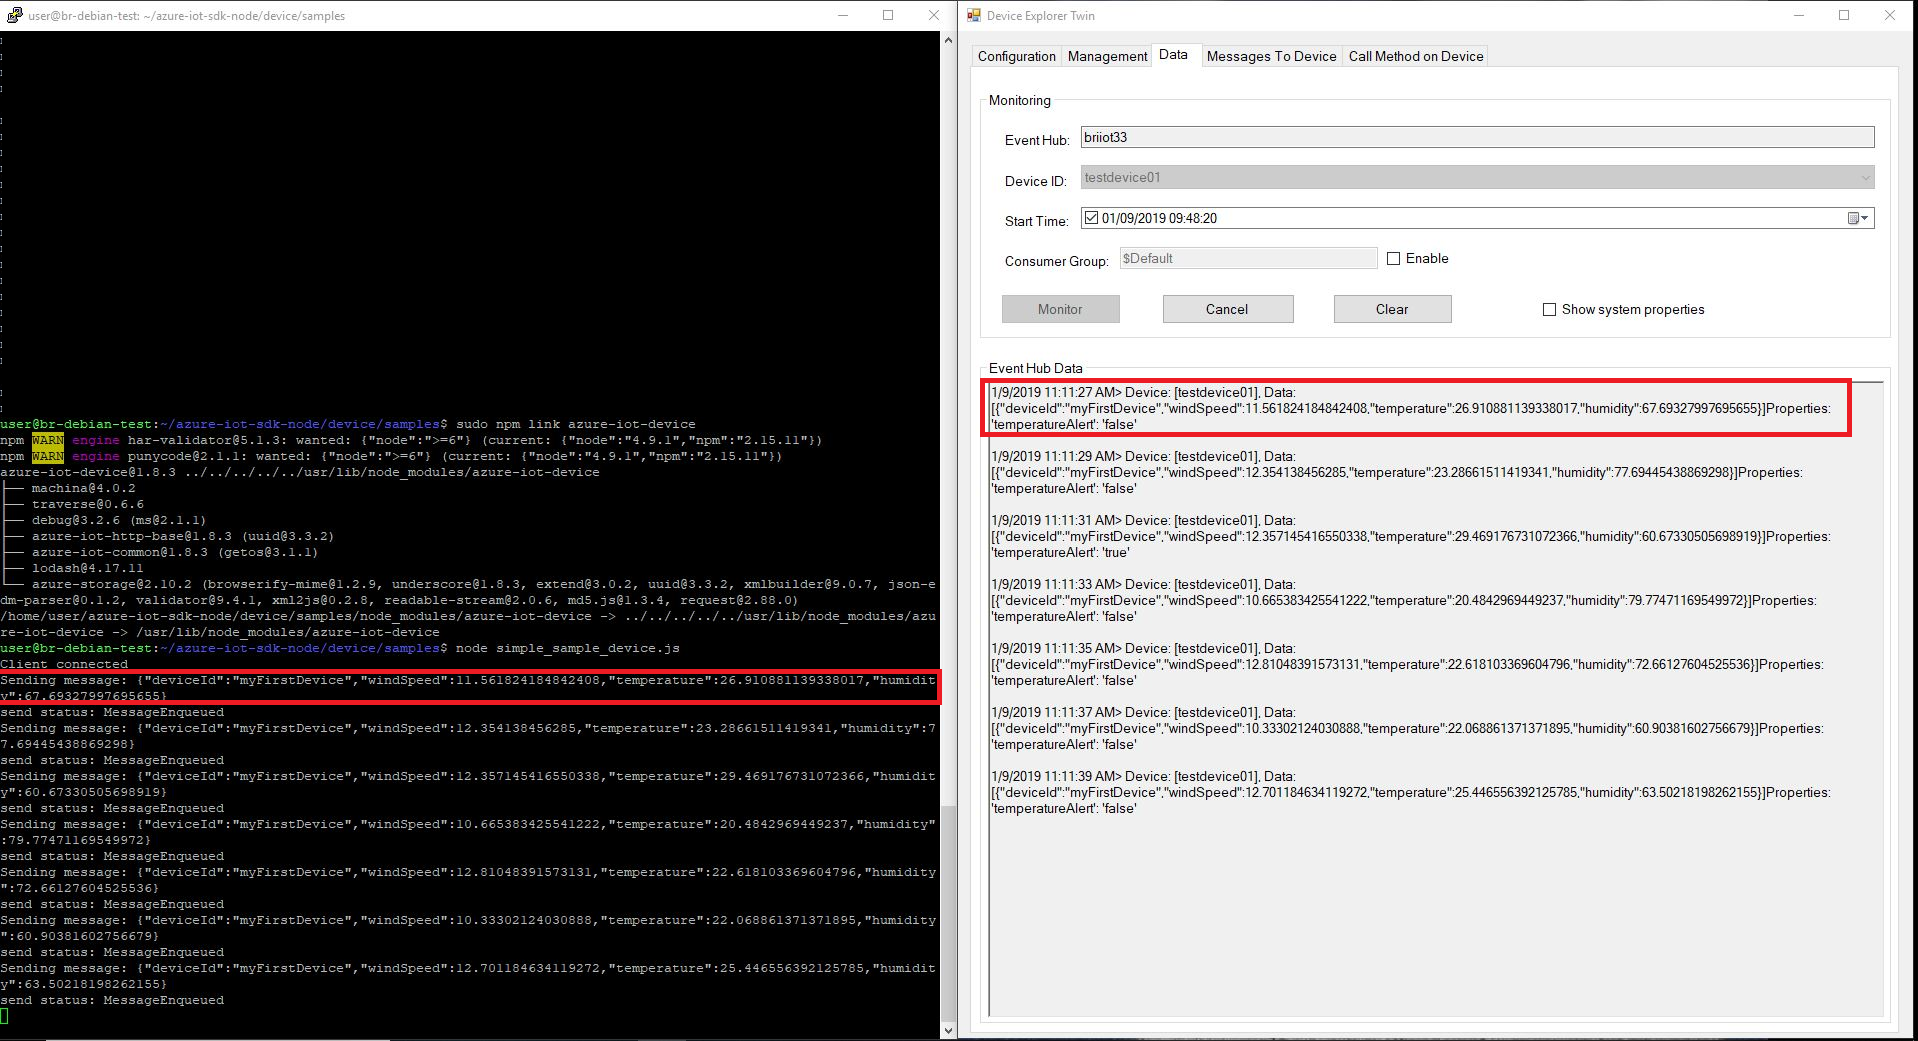
Launch the DeviceExplorer as explained in Step 2 and navigate to Data tab. Select the device name you created from the drop-down list of device IDs, click Monitor button.

-
DeviceExplorer is now monitoring data sent from the selected device to the IoT Hub.
-
Run the sample by issuing following command:
node ~/azure-iot-sdk-node/device/samples/simple_sample_device.js -
Verify that data has been successfully sent and received. If any, then you may have incorrectly copied the device hub connection information.
-
DeviceExplorer should show that IoT Hub has successfully received data sent by sample test.

3.3.2 Receive messages from IoT Hub
-
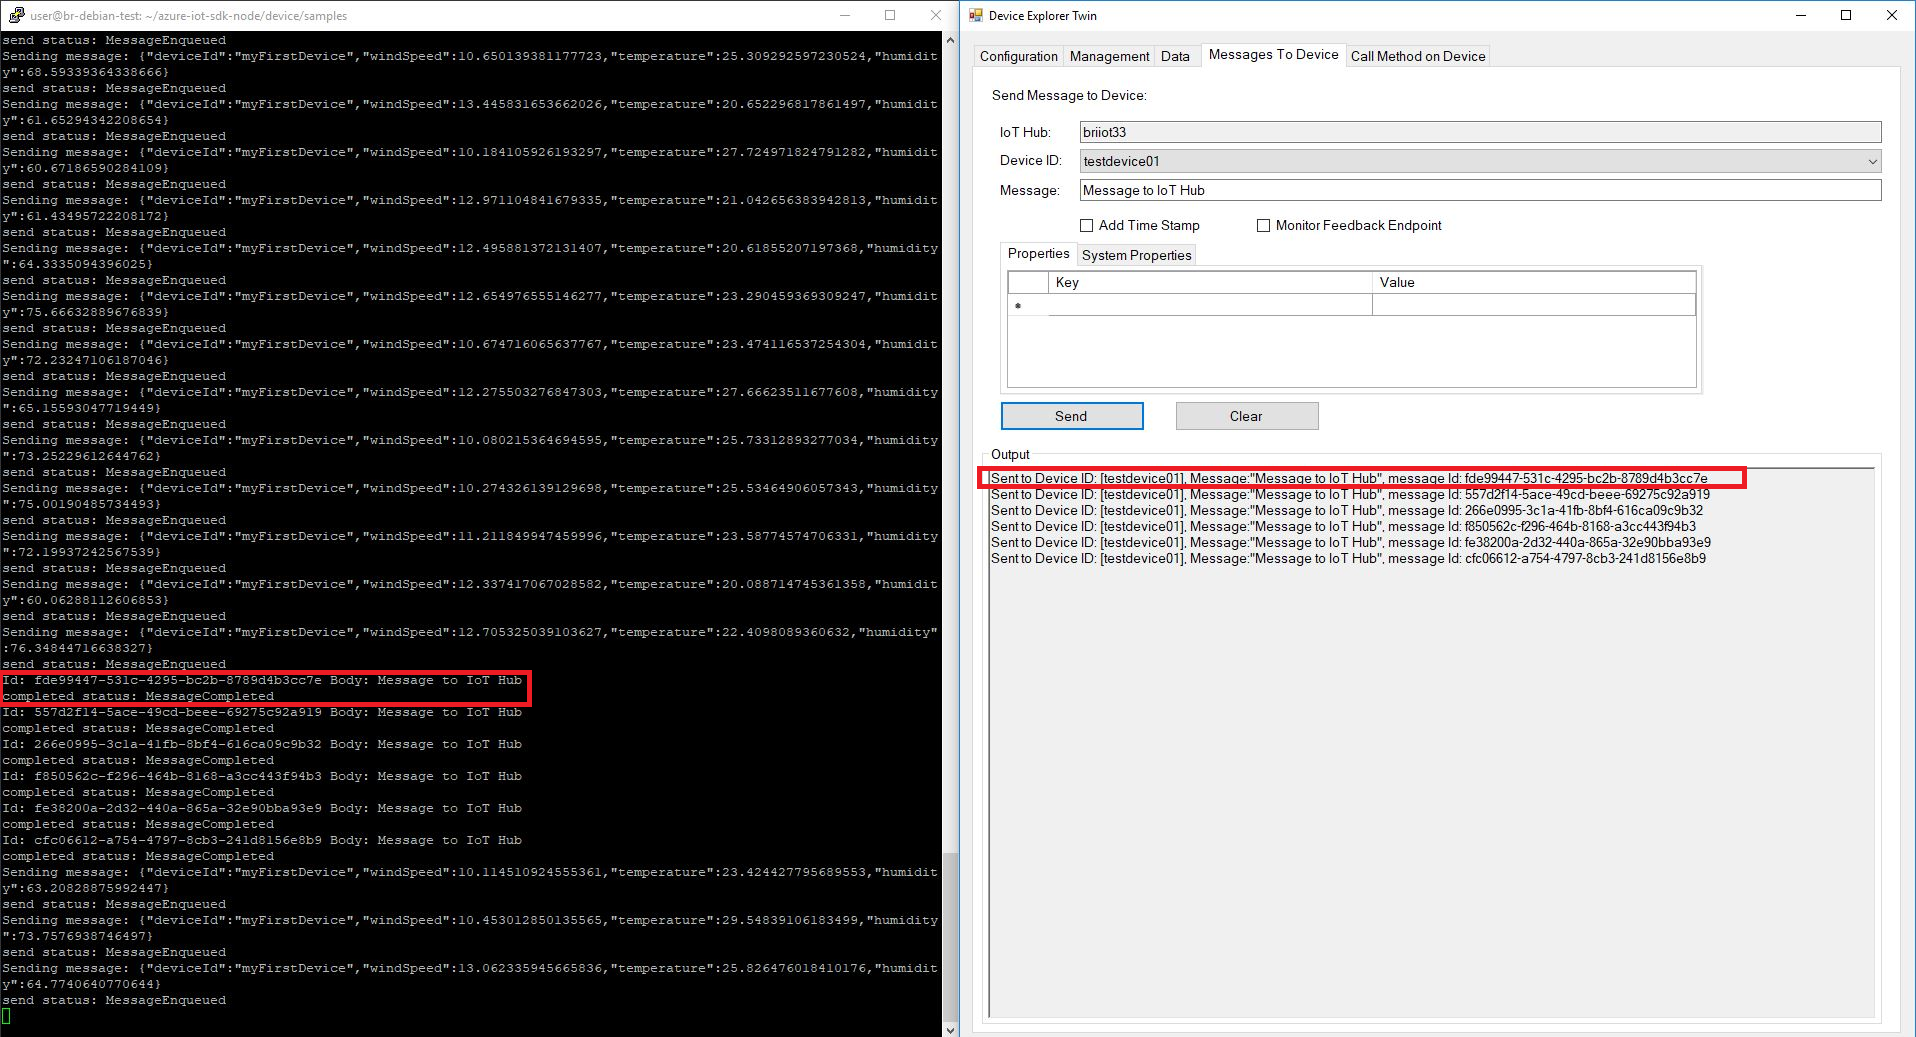
To verify that you can send messages from the IoT Hub to your device, go to the Message To Device tab in DeviceExplorer.
-
Select the device you created using Device ID drop down.
-
Add some text to the Message field, then click Send button.
-
You should be able to see the command received in the console window of the client sample.

Step 4: Troubleshooting
Please contact engineering support on support@br-automation.com for help with troubleshooting.
Reference: Some information in this document is obtained from here.